Companion Planting With Flowers – Which Flowers Are Best?
Looking for which plants are best for companion planting with flowers? This article contains a table with the best flowers and their many benefits.
Tallow has been a staple for centuries, prized for its versatility and variety of uses. As a food item, it’s packed with healthy saturated fats and fat-soluble vitamins, making it both nutritious and incredibly stable. For cooking, its high smoke point and rich flavor make it perfect for frying and roasting. And in skincare, its unique composition deeply hydrates and nourishes the skin—without any synthetic additives.
It’s no wonder so many are now turning to tallow for many of their own uses. Rendering tallow at home is not only simple but deeply rewarding, yielding one of the most versatile fats. Whether you’re a first-time tallow maker or looking to perfect your technique, this guide will walk you through the most efficient and effective way to make the highest-quality tallow in your own kitchen.
After years of trial and error, I’ve learned the tips and tricks that take your tallow from merely good to incredible. In this step-by-step guide, I’ll show you exactly how to render pure, high-quality tallow while steering clear of common mistakes that often trip up beginners.
A quick note before we start: the quality of your output (tallow) is dictated by the quality of your input (the raw fat/suet you source). Like any recipe, the quality of your ingredients determines the quality of the end product. That’s why the first step here is dedicated to finding and preparing the best possible suet.
Essentially, making tallow at home involves three key steps: obtain and prepare the suet, wet rendering to remove impurities, followed by dry rendering to remove any residual water.
Although tallow is simply refined animal fat (usually beef, but can also be sheep, goats, and even pork), not all fat is equal, and choosing the right type and source of fat is essential for your high-quality tallow.
The best fat for rendering by a large margin is leaf suet – the fat surrounding the kidney and organ areas of cows. Compared to other types of fat, such as subcutaneous fat found under the skin, suet has a higher concentration of healthy fats, a cleaner texture, and renders into a firmer, more stable tallow compared to regular beef fat.
Using lower-quality fat, such as trimming fat from muscle cuts, will result in a softer, greasier tallow with a stronger beefy smell. For the purest and longest-lasting tallow, always opt for kidney suet whenever possible.
While not essential, I always recommend grass-fed and grass-finished suet for both cooking and skincare due to its higher nutrient content, cleaner fat profile, and lack of toxins. It also contains more omega-3s, conjugated linoleic acid (CLA), and fat-soluble vitamins (A, D, E, K), making it healthier, more stable, and better for skin nourishment.
The raw suet can come in many forms, often large chunks of fat like that pictured below. I typically buy my suet ground from the butcher, as ground suet will render much more quickly and evenly than fat that is left in large chunks.
Depending on where you buy your suet, they may not be able to grind for you, so you can do this yourself in a grinder or food processor. Alternatively, most smaller butchers will be happy to grind your meat up for you for a small cost. The smaller the better, as it will render faster and more evenly, ultimately leading to a better end-product.
With your suet ground and ready to go, we can begin the rendering process. Rendering is simply the process of slowly heating the raw animal fat to separate the pure fat (lipids) from connective tissue, proteins, and other impurities.
Like with most fats, there are two ways to render tallow: dry or wet. As the name suggests, wet rendering involves the use of water, whereas dry rendering does not. Both have their pros and cons, which we will discuss throughout the article, but I personally combine both methods to maximize the benefits of both while minimizing the downsides.
Typically we will perform two wet rendering stages to remove the most impurities possible, followed by a third dry rendering stage to remove as much moisture from the tallow prior to storage.
To wet render, we first need a container to melt the fat. I (like most) use a crock pot/slow cooker which is perfect for applying a low but consistent temperature that is crucial for obtaining the perfect tallow.
You can do this in any pot or pan on the hob/stove and even inside the oven, although I much prefer to use a crockpot in a quiet corner of the kitchen where it’s out of the way, and simply set and forget it for a few hours.
You’ll need only two other ingredients for wet rendering: water and salt. The water helps to regulate the temperature of the mixture, preventing the fat from burning, while also separating impurities, allowing them to settle at the bottom for easy removal.
The salt is optional but I find it helps to draw out impurities and unwanted proteins, making the final tallow purer and less beefy-smelling. The salt stays in the water and does not remain in the finished product at all, so you don’t have to worry about a “salty” tallow.
Although opinions vary widely, I’ve settled on 1 tsp salt and about ⅔ of a cup of water for every quart of tallow. Although this may vary on your setup, it should be enough water for around 1” deep from the bottom of the pan. There is no exact science here, we are just looking for enough to ensure the tallow won’t burn, while not too much that would take forever to evaporate off.
First, mix the water and salt, bring to a gentle boil, and then let cool to around 250 F. From here, add your tallow.
With your tallow, water, and salt in the pan, set the temperature to low and simply allow it to heat for 4 or so hours. If your mixture is large chunks, you may require a little more time to allow the larger chunks to melt. Slow and steady is the key, and as long as you keep the heat low, there is no risk of over-rendering it.
Stir a few times throughout the cooking process to keep heat consistent and avoid the bottom of the tallow burning.
Ideally, we want to keep the temperature of the tallow mix to at least 220 F, to ensure the water can boil off, but below 275 F to ensure it doesn’t burn. I aim for a constant temperature of 250F, which I check with a thermometer.
After around 4 hours of heating, you’ll end up with a clear amber liquid with large chunks of meat and impurities floating on top. Pour the entire mixture through a cheesecloth (I place a cheesecloth on top of a metal strainer) and drain the mixture into a new clean container (preferably a circular bowl, for reasons we will see below). This is your first clean rendered tallow.
Allow to cool for a few hours and it will turn into a whitish solid lump. We now need to separate this from the water underneath, which is much easier done in a rounded bowl.
On the bottom of the tallow cake, you’ll see a brownish layer of sediment and impurities that were drawn out by the water and salt. Remove this manually by scraping it off until you can see a nice clean white surface.
While this first rendering will remove 80% of the impurities, a second round will remove around 98% to achieve a very pure tallow. Repeat the process by adding water, salt, and the tallow into the crock pot and melt on low heat for a further 4 hours.
For a second time, strain the mixture through a cheesecloth into a rounded bowl, and allow it to cool and harden. Once more, remove the cake from the water, and scrape off any remaining impurities by hand. Once complete, you now have your pure tallow ready for immediate use.
Once two rounds of wet rendering are complete, you can stop here, especially if it is just for personal use for cooking, and you’ll use it up quickly (less than 3 months).
If you wish to make tallow that will last for longer (we regularly store our tallow for up to one year with no problems), or wish to make particularly pure stuff with little odor (e.g. for skincare use), then I recommend one more rendering, this time dry, to remove as much moisture as possible, that will ensure the product is purely and will last much longer.
Dry rendering is similar to wet rendering, except we forgo the salt and water and heat at a low temperature for a couple of hours. Without the temperature modulation from water, it is even more important to set a low temp of around 250 F and stir frequently to ensure it doesn’t burn.
Continue heating until all bubbling stops—bubbles indicate remaining water. I typically leave to heat for a further hour after all bubbles disappear, just to be sure.
Once fully melted and moisture-free, strain the tallow through a cheesecloth into a clean container. Let it cool and solidify at room temperature. While cooling and hardening, try to keep plenty of airflow around it to ensure any remaining water can evaporate and does not get trapped.
While it may seem like unnecessary repetition, dry rendering extends shelf-life (over a year if moisture-free and prevents mold growth from trapped water. Combined, this results in a firmer, purer tallow for cooking, skincare, and soap-making.
Since tallow is naturally shelf-stable, how long it lasts depends on how it’s stored.
If you plan to use your tallow within a few weeks, it can be kept at room temperature in a clean, airtight jar on your countertop. Store it in a cool, dry place, away from heat and direct sunlight. For slightly longer storage, a cool basement or pantry works well.
For extended shelf life, refrigeration or freezing is best. Properly rendered tallow will last months in the fridge and years in the freezer without going rancid. To avoid contamination, always use a clean spoon when scooping tallow from the jar.
When pouring melted tallow into jars, be careful to leave behind any water that may have settled at the bottom of your container. Even small amounts of water can cause mold over time.
Ensure your containers are also bone-dry before pouring into them. Wash them ahead of time and allow them to fully dry.
For added protection, let your tallow sit in the open air for a bit before sealing, allowing any last traces of moisture to evaporate.
Essentially, making tallow at home involves three key steps: obtain and prepare the suet, wet rendering to remove impurities, followed by dry rendering to remove any residual water.
The best fat for rendering by a large margin is leaf suet – the fat surrounding the kidney and organ areas of cows. Compared to other types of fat, such as subcutaneous fat found under the skin, suet has a higher concentration of healthy fats, a cleaner texture, and renders into a firmer, more stable tallow compared to regular beef fat.
Ideally, we want to keep the temperature of the tallow mix to at least 220 F, to ensure the water can boil off, but below 275 F to ensure it doesn’t burn. I aim for a constant temperature of 250F, which I check with a thermometer.
Looking for which plants are best for companion planting with flowers? This article contains a table with the best flowers and their many benefits.
The ultimate guide to reap the benefits of no-dig gardening, complete with a step-by-step guide on building your own.
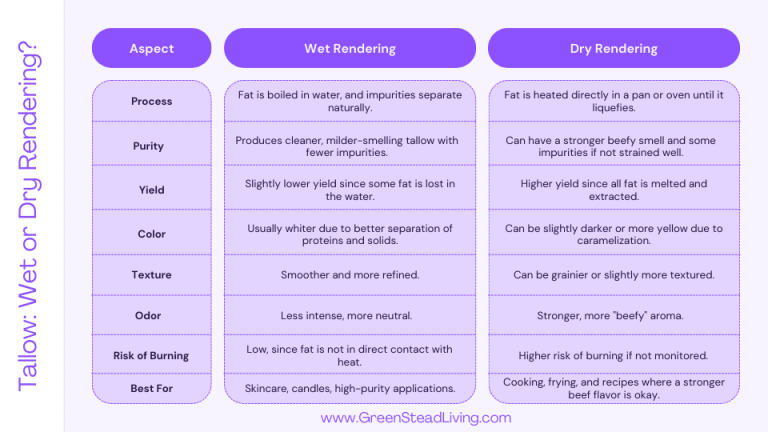
Learn how to make beef tallow at home with this step-by-step guide. Perfect for cooking and skincare, this method ensures pure, long-lasting tallow.
Pinterest Instagram Youtube Pinterest Instagram Youtube Jump to: Have you ever stopped to consider what’s really in the water flowing from your tap? For many of
Here are the 5 best companion plants for strawberries, and how each will compliment each other for healthier and more lucrative strawberries.
Learn how to grow basil from seed: start by sowing seeds in well-draining soil, keep the soil moist, and provide plenty of sunlight for a thriving herb garden